Updated: 2026 Technical Guide · By Sailwin Engineering Team
A blown PET bottle that is oval at the base, hazy under the shoulder, or short on one side of the mould is rarely a preform problem. In the factories we audit, it is usually a cooling water problem. The mould is doing exactly what it was told to do — the water arriving at it is too warm, moving too slowly, or distributed unevenly from cavity to cavity.
The reason this matters more than other process variables is that cooling carries the largest single share of PET blow molding cycle time. It is also the variable most often missing from a machine’s data records. Air pressure is on the HMI, heating zone temperatures are on the HMI, but chilled water flow per circuit is often not measured at all. Something that is not measured cannot be controlled, and something that is not controlled gets compensated for by lengthening cooling time by a second or two. On a machine that is expected to produce thousands of bottles per hour, that compensation is expensive, and it hides the real fault.
Sailwin has built PET blow molding machines for more than 15 years, with 500+ machines delivered to 60+ countries under CE and ISO 9001:2015 certification. This article sets out the chilled water temperature, flow and circuit design rules we apply on our own machines, how each cooling error presents itself in the finished bottle, and which readings to put on the shift sheet so cooling stops being an invisible variable.
Key Takeaways
- Chilled water at 8–12°C is the working range, and it is a supply condition — not a mould condition. The temperature that controls crystallisation is the mould surface temperature, which depends on flow and circuit geometry as much as on the chiller setpoint.
- Flow does the cooling, pressure only moves the water. A temperature rise of more than about 3°C between the inlet and outlet of a mould circuit is the earliest available warning that flow has fallen.
- Cavity-to-cavity balance is decided at the manifold, not at the chiller. A larger chiller cannot fix an unbalanced parallel circuit; it only makes the whole mould equally under-cooled.
Cooling Problems Causing Scrap?
Describe the bottle, the defect and your cycle time. Sailwin engineers reply with a cooling circuit review and machine recommendation.
1. What Chilled Water Temperature Should a PET Mould Run At?
Sailwin specifies chilled water supply at 8–12°C across our PET blow molding range, paired with high-pressure blowing air at 25–40 bar. This is a widely used band in the industry, but the number itself is less important than understanding what it does and does not control.
The chiller setpoint is the temperature of the water entering the mould. The temperature that actually decides how fast the polyester freezes is the mould surface temperature at the moment the bottle is pressed against it. Between those two numbers sit the flow rate, the circuit diameter, the length of hose, the condition of the mould’s internal channels and the thermal conductivity of the mould material. Two machines can run the same 10°C supply and produce completely different bottles.
| Application | Supply water | What the setting is really managing |
|---|---|---|
| Still water, thin wall | 8–12°C | Fast solidification for clarity and dimensional stability; the shortest cooling share of cycle time |
| Carbonated / CSD bottles | 8–12°C | Base and petaloid cooling, because that region carries the internal pressure load |
| Wide-mouth jars, ≤130 mm neck | 8–12°C | Thick neck and shoulder sections, which hold heat longer than the body |
| Large format, up to 20 L | 10–14°C typical | Very thick sections and long cycle times; pulling the water colder rarely helps and risks internal stress |
Two practical limits sit around this band. Going colder than necessary raises the risk of condensation on the mould face in humid plants, which introduces water marks and, in the worst case, contamination of the blowing air circuit. Going warmer pushes you toward slower crystallisation, higher haze and a longer cooling time that has to be recovered from the cycle somewhere else.
2. Flow Rate and Temperature Difference: The Variable Nobody Records
Heat transfer in a mould circuit improves dramatically once the water is in turbulent flow. Laminar flow lets a slow-moving boundary layer of warm water sit against the channel wall and act as insulation, no matter how cold the chiller is. The practical consequence is that increasing flow will often fix a cooling problem that lowering the setpoint cannot.
This is why the single most useful instrument on a PET machine is not a chiller thermostat but two thermometers on the inlet and outlet of each mould circuit. The difference between them is the circuit’s thermal load. A well-designed, adequately supplied circuit shows a small rise; a starved circuit shows a large one because the same water is absorbing more heat per litre.
| Reading | What it usually means |
|---|---|
| Inlet/outlet rise of 1–3°C on a healthy circuit | Flow is adequate for the heat load; the circuit is doing its job |
| Rise above roughly 5°C | Restricted flow: undersized hose, partially closed valve, blocked or scaled channel, or too many circuits sharing one supply |
| Small rise and stable, but bottles still hazy | The circuit is cooling water that never reaches the critical part of the mould — a layout problem, not a flow problem |
| Cavity weights that differ by more than the agreed tolerance band | Unbalanced parallel circuits — some cavities see less water than others |
| Condensation on the mould face | Supply temperature below the ambient dew point; raise the setpoint or dehumidify rather than accepting the water marks |
Want the Cooling Circuit Audited?
Send a mould drawing or a photo of your current manifold. We review circuit layout, hose sizing and balance and reply with specific changes.
If you only add one instrument to a PET line this year, add a thermometer pair to each mould circuit inlet and outlet. Cycle time, haze and base deformation all trace back to the same underlying quantity — how much heat the water is carrying away per second — and that quantity is visible only in the temperature rise across the circuit.
3. Circuit Design: Series, Parallel and Cavity-to-Cavity Balance
How water is routed through the mould matters as much as how cold it is. Three patterns are common, and they fail in different ways.
- Single series path through all cavities. Simple and cheap to build, but every cavity downstream receives water already warmed by the cavities ahead of it. The first cavity runs cool and the last runs warm, which produces a systematic variation in bottle quality across the mould.
- Parallel circuits fed from one manifold. The correct approach, provided the manifold is sized so that each branch sees the same pressure drop. Unbalanced manifolds are the most common defect we find on third-party moulds, and they cannot be corrected at the chiller.
- One dedicated circuit per cavity with its own flow indicator. The most controllable arrangement and the one that makes a per-cavity fault visible immediately. It costs more at build time and saves considerably more in diagnosis time over the life of the mould.
Whatever the layout, keep hose runs short and bore sizes consistent. A single undersized or kinked hose in a parallel bank steals flow from every other branch, and the effect is invisible unless you are measuring per-circuit temperature rise. Quick-release couplings are worth specifying on machines where mould changes are frequent: Sailwin machines are designed for mould changes in under 30 minutes, and cooling connections are one of the steps that decide whether that target is met in practice.
4. How Cooling Errors Show Up in the Finished Bottle
Cooling faults are indirect. They rarely announce themselves as a cooling message on the HMI, so the useful skill is reading the defect backwards to the cause. The table below maps the defects most often blamed on the preform or on blowing pressure to the cooling conditions that actually produce them.
| Defect | Cooling cause to check first | Other candidates |
|---|---|---|
| Haze or pearl effect in the body wall | Mould surface too warm at contact; insufficient flow to the body panels | Wet preform, low stretch ratio, heating profile too cold |
| Base deformation or rocking bottle | Base insert cooling inadequate; ejection before the base has set | Blowing pressure too low, stretch rod timing, poor base preform design |
| Ovality or out-of-round neck | Uneven heat removal around the neck ring; unbalanced cavity circuits | Preform neck dimensions, mould wear, incorrect neck cooling inserts |
| Wall thickness varying between cavities | Parallel circuit imbalance between cavities | Heating lamp variation, preform weight per cavity, stretch rod alignment |
| Stress cracking after filling | Over-cooling, which builds locked-in stress; check whether the setpoint was lowered to chase a cycle-time target | Handling damage, bottle too warm at filling, carbonation pressure |
5. Sailwin Case Study: Removing a One-Second Cooling Penalty
- A Southeast Asian beverage plant running a 6-cavity PET line for water bottles
- Cooling time had been manually extended to stop intermittent base deformation
- Cooling water was not measured; the chiller had been set progressively colder to compensate
- Inlet and outlet thermometers fitted to each of the six cavity circuits and logged per shift
- Circuit audit found two cavities fed through longer, smaller-bore hose than the others
- Hose bore equalised and circuits re-balanced; supply returned to the specified 8–12°C band
- Cavity weights brought inside the agreed tolerance band and held there by measurement, not by guesswork
- Manually added cooling time removed, restoring the cycle the machine was specified to run
- Chiller no longer pushed below the specified band, removing the condensation risk on the mould face
Scenario based on a Sailwin customer project; final configuration is confirmed against your mould drawing during engineering review.
6. What to Specify on the Machine and the Utilities
Cooling performance is bought twice: once in the mould, once in the machine and plant utilities around it. The following Sailwin specifications are the ones that directly affect how well a PET mould can be cooled and how repeatably the process holds.
- Process control. PID temperature control held to ±1°C, blowing pressure in the 25–40 bar range, and preform heating at 90–115°C across the lamp zones. Heating stability decides how uniform the material distribution is before the mould ever sees the preform.
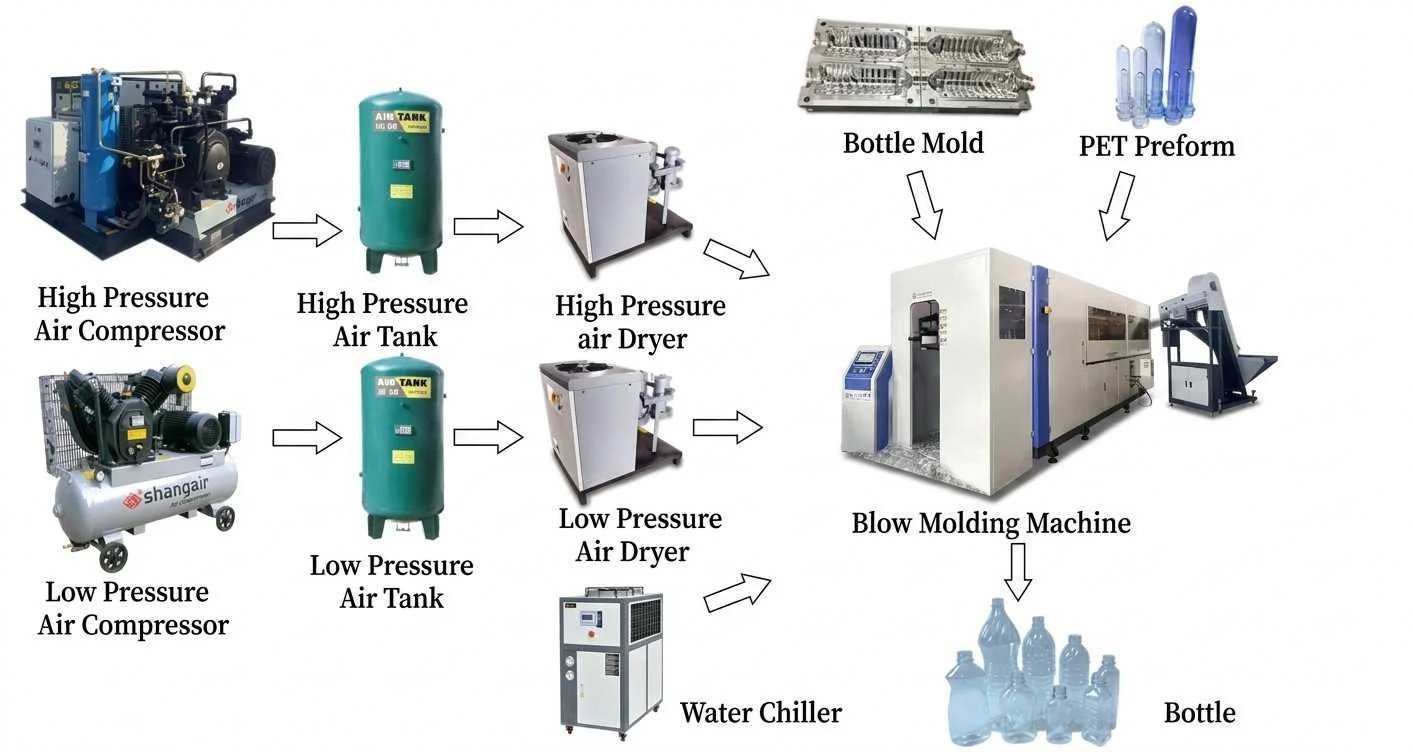
- Plant air. High-pressure air at 30–40 bar and low-pressure air at 8–10 bar, with high-pressure exhaust recovery that reduces air compressor load by around 20%.
- Chilled water. 8–12°C supply, with the circuit instrumentation described above so that flow, not just temperature, is under control.
- Visibility. Siemens or Mitsubishi PLC monitoring 40+ parameters in real time, which turns a cooling fault into a trend line instead of a defect found at the end of the shift.
- Model range. From SW-F2-650 (2 cavity, 2,800 BPH up to 650 ml) and SW-F4-650 (4 cavity, 5,500 BPH up to 600 ml) through SW-F4-2000 (4 cavity, 4,500 BPH up to 1,800 ml) and SW-F6-2000 (6 cavity, 7,500 BPH up to 1,800 ml) to SW-F6H-800 (6 cavity, 12,000 BPH up to 800 ml) and SW-F8H-800 (8 cavity, 16,000 BPH up to 800 ml).
- Delivery and support. 30–45 day lead time (45–60 days for custom builds), full-load FAT testing before shipment, 3–7 days on-site installation and commissioning, common wear parts shipped within 48 hours, 7×24 remote support and a 2-year whole-machine warranty.
If you are planning a mould change from a series to a parallel layout, or adding circuits to an existing mould, that is an engineering decision worth reviewing with the machine supplier before the mould is cut. Changing the circuit geometry after the fact is considerably more expensive than specifying it correctly.
Frequently Asked Questions
Get a Mould Cooling and Machine Review
Send your bottle drawing, container sample or target output. Our engineering team replies with a machine recommendation, mould assessment and factory-direct quotation within 24 hours.
Related Reading:
• PET Blow Molding Machine Range — 0.1 L to 20 L
• Automatic PET Blow Molding Machines — up to 16,000 BPH
• PET Bottle Wall Thickness: QC Method and Tolerances
• Electrical and Utility Requirements for a PET Line
• PET Blow Molding Machine Buying Guide